传统重型应用服务器Websphere Application Server容器化的实践
2016年7月,中国银监会发布了《中国银行业信息科技“十三五”发展规划监管指导意见(征求意见稿)》(下称《意见》),《意见》表示,探索构建私有云平台,采用成熟度高、开放性强的计算虚拟化、容器虚拟化、分布式存储、网络虚拟化等技术,建立资源池,形成资源弹性供给、灵活调度和动态计量的私有云平台。同时,同步开展应用架构规划,构建与云计算基础设施相适应的应用架构,自主设计或推动应用开发商实施应用架构改造,并降低应用与基础架构的耦合度。从《意见》的描述可以看到,容器技术天生的优势以及在大规模集群管理、混合云平台构建、微服务化应用以及云原生应用等场景的广泛应用,很大程度上与金融业IT 的战略转型发展规划相契合。容器技术正在为传统金融业IT 技术转型提供一种颠覆性的转型思路。
传统WAS容器化及相关实践
从2016开始,睿云智合(Wise2C)接触了一定数量的金融客户同时实施了好几个容器化管理平台的项目,项目中实施的中间件包括Websphere/WebLogic/JBOSS EAP /TOMCAT等,在项目中针对不同客户的具体应用的容器化感受颇深,理论上重型应用服务器Websphere Application Server(简称WAS)和WebLogic不能很好的在容器云平台充分发挥大规模部署和弹性伸缩的优势,但是在当前金融客户实际环境中,大量的应用仍然按照传统的方式部署在WAS和WebLogic上,所以睿云智合(Wise2C)也积极做了相关研究和探索以支持传统的应用服务器WAS和WebLogic容器化,满足当前金融客户的需求,此篇文章主要介绍传统WAS容器化及相关实践。
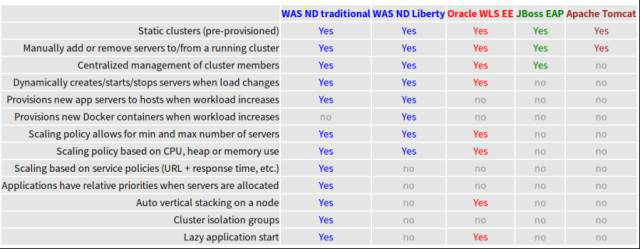
首先对典型的应用服务器的特性做个对比,参考下图,由此我们不难知道为什么WAS在金融行业仍然占主导地位。

这里就不对WAS的基本概念做展开了,当前金融客户中WAS应用服务服务器运行主要包括两种模式:Standalone和ND集群。在之前的项目中我们已经对Nginx+多节点WAS Standalone 和WAS ND Cluster+HIS分别进行了容器化并进行了相关简单压测对比,并实现了一键部署和弹性伸缩,另配合公司产品WiseBuild实现Java项目在WAS Standalone持续集成和持续部署。
WAS Standalone

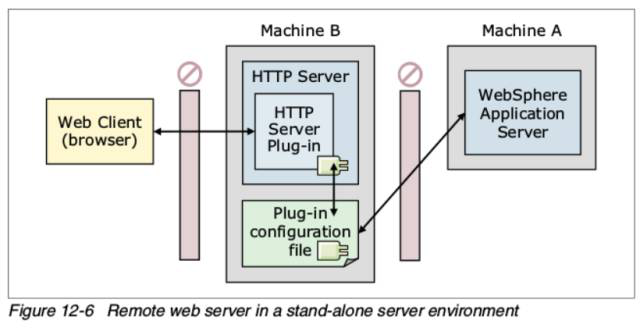
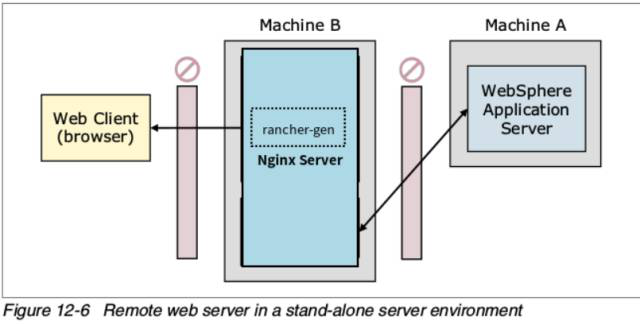
上图是WAS Standalone结合IBM HTTP Server简称IHS,IBM开发了Websphere Plug-in以实现IHS和WAS的紧密结合,实测中IHS性能表现优秀,但是Nginx作为当前另一款优秀的Web Server,我们参考相关官方资料用它取代IHS并结合rancher-gen实现了WAS在Rancher容器管理平台的一键部署和弹性伸缩,请参考下图

金融行业当前主流WAS应用服务器的版本是8,与旧版本相比,IBM已经用Installation Manager取代之前的updateinstaller,在WAS的dockerlized容器化中我们需要用静默安装取代GUI的图形化安装,以下是WAS安装的Dockerfile
WAS安装的Dockerfile
FROM rhel:7.2
ARG USER=wasdmin
ARG GROUP=wasadmin
COPY scripts /scripts
ARG URL=http://harbor01.test01.com:8080/was8/
ENV PATH /websphere/IBM/WebSphere/AppServer/bin:$PATH
###################### IBM Installation Manager ##########################
# Install IBM Installation Manager
RUN groupadd $GROUP && useradd -g $GROUP $USER -m \
&& mkdir -p /websphere/IBM/WebSphere/AppServer/ \
&& chown -R $USER.$GROUP /websphere /tmp /var \
&& wget -q $URL/agent.installer.linux.gtk.x86_64_1.6.2000.20130301_2248.zip -O /tmp/IM.zip \
&& mkdir /tmp/im && unzip -qd /tmp/im /tmp/IM.zip \
&& /tmp/im/installc -acceptLicense -accessRights nonAdmin \
-installationDirectory “/websphere/IBM/InstallationManager” \
-dataLocation “/var/ibm/InstallationManager” -showProgress \
&& rm -fr /tmp/IM.zip /tmp/im
################# IBM WebSphere Application Server ######################
# Install IBM WebSphere Application Server v855
RUN wget -q $URL/WASND_v8.5.5_1of3.zip -O /tmp/was1.zip \
&& wget -q $URL/WASND_v8.5.5_2of3.zip -O /tmp/was2.zip\
&& wget -q $URL/WASND_v8.5.5_3of3.zip -O /tmp/was3.zip \
&& mkdir /tmp/was && unzip -qd /tmp/was /tmp/was1.zip \
&& unzip -qd /tmp/was /tmp/was2.zip \
&& unzip -qd /tmp/was /tmp/was3.zip \
&& /websphere/IBM/InstallationManager/eclipse/tools/imcl -showProgress \
-acceptLicense install com.ibm.websphere.ND.v85_8.5.5000.20130514_1044 \
-repositories /tmp/was/repository.config \
-installationDirectory /websphere/IBM/WebSphere/AppServer \
-preferences com.ibm.cic.common.core.preferences.preserveDownloadedArtifacts=false \
&& rm -fr /tmp/was /tmp/was1.zip /tmp/was2.zip /tmp/was3.zip
############## IBM WebSphere Application Server Fixpack ##################
# Install IBM WebSphere Application Server Fixpack v85510
RUN wget -q $URL/8.5.5-WS-WAS-FP0000009-part1.zip -O /tmp/wasfp1.zip \
&& wget -q $URL/8.5.5-WS-WAS-FP0000009-part2.zip -O /tmp/wasfp2.zip \
&& mkdir /tmp/wasfp \
&& unzip -qd /tmp/wasfp /tmp/wasfp1.zip \
&& unzip -qd /tmp/wasfp /tmp/wasfp2.zip \
&& /websphere/IBM/InstallationManager/eclipse/tools/imcl -showProgress \
-acceptLicense install com.ibm.websphere.ND.v85_8.5.5009.20160225_0435 \
-repositories /tmp/wasfp/repository.config \
-installationDirectory /websphere/IBM/WebSphere/AppServer \
-preferences com.ibm.cic.common.core.preferences.preserveDownloadedArtifacts=false \
&& rm -fr /tmp/wasfp /tmp/wasfp1.zip /tmp/wasfp2.zip
########################### Install Java SDK 8.0 ########################
# Install Java SDK 8.0
RUN wget -q $URL/7.1.3.30-WS-IBMWASJAVA-Linux.zip -O /tmp/java.zip \
&& mkdir /tmp/java \
&& unzip -qd /tmp/java /tmp/java.zip \
&& /websphere/IBM/InstallationManager/eclipse/tools/imcl -showProgress \
-acceptLicense install com.ibm.websphere.IBMJAVA.v71_7.1.3030.20160224_1952 \
-repositories /tmp/java/repository.config \
-installationDirectory /websphere/IBM/WebSphere/AppServer \
-preferences com.ibm.cic.common.core.preferences.preserveDownloadedArtifacts=false \
&& rm -fr /tmp/java /tmp/java.zip
ENV PATH /websphere/IBM/WebSphere/AppServer/bin:$PATH
RUN managesdk.sh -setCommandDefault -sdkname 1.7.1_64 \
&& managesdk.sh -setNewProfileDefault -sdkname 1.7.1_64 \
&& /websphere/IBM/WebSphere/AppServer/bin/manageprofiles.sh -create -profileName AppSrv01 \
-profilePath /websphere/IBM/WebSphere/AppServer/profiles/AppSrv01 \
-templatePath /websphere/IBM/WebSphere/AppServer/profileTemplates/default \
-nodeName DefaultNode01 -cellName DefaultCell01 -hostName localhost \
-serverName server1 -enableAdminSecurity true -adminUserName wasadmin -adminPassword “wasadmin” \
&& chown -R $USER.$GROUP /websphere
CMD [“tar”,”cvf”,”/tmp/was.tar”,”/websphere/IBM/WebSphere/AppServer”]
构建基础WAS安装镜像
docker build –build-arg USER=<user> –build-arg GROUP=<group> \
–build-arg URL=<URL> -t ibmwas8:prereq .
这里如果不指定参数将使用Dockerfile的默认参数,生成镜像ibmwas8:prereq 然后基于此镜像运行下面指令产生一个完整的WAS安装tar包:was.tar.
docker run –rm -v $(pwd):/tmp ibmwas8:prereq
有了基本的WAS安装包,就可以分别构建WAS Standalone 和WAS ND Cluster,当然构建后者是相当复杂的,这里主要介绍下构建WAS Standalone和Nginx结合
以下是构建WAS Standalone的Dockerfile
FROM rhel:7.2
ARG USER=wasadmin
ARG GROUP=wasadmin
COPY scripts /scripts
RUN mkdir -p /websphere/ \
&& groupadd $GROUP \
&& useradd $USER -g $GROUP -m \
&& chown -R $USER.$GROUP /scripts \
&& chmod +x /scripts/*
#USER $USER
ADD was.tar /websphere/
RUN /scripts/create_profile.sh
ENV PATH /websphere/IBM/WebSphere/AppServer/bin:$PATH
EXPOSE 9080 9043
CMD [ “/scripts/startserver.sh” ]
其中需要注意的是如果想WAS Standalone能被容器快速拉起的话,需要把创建profile直接打入镜像,否则通过ENTRYPOINT或者CMD在容器拉起时执行创建profile将会比较慢
Rancher-Gen,结合Nginx
Rancher-Gen是一个Python的工具,它能监听的Rancher服务的变化,并呈现一个用户指定的Jinja2模板。这允许用户为现有的、并基于这些变化的服务生成配置文件。另外,Rancher-Gen提供了一种机制,在模板呈现之后会运行通知命令,基于此,所以它能自动检测后端服务的变化,并实现nginx的动态更新
构建Nginx和Rancher-Gen的Dockerfile
FROM phusion/baseimage
MAINTAINER pitrho
# Step 1– Install nginx and python
ENV DEBIAN_FRONTEND noninteractive
RUN \
apt-add-repository -y ppa:nginx/stable && \
apt-get update && \
apt-get install -y python-software-properties \
wget \
nginx \
python-dev \
python-pip \
libev4 \
libev-dev \
expect-dev && \
rm -rf /var/lib/apt/lists/* && \
chown -R www-data:www-data /var/lib/nginx && \
apt-get clean
# Step 2 – Install rancher-gen
ENV RANCHER_GEN_VERSION 0.3.0
RUN pip install rancher-gen==$RANCHER_GEN_VERSION
# Step 3 – Define services
RUN mkdir /etc/service/nginx /etc/service/rancher_gen /nginxconf
COPY nginx_run /etc/service/nginx/run
COPY rancher-gen_run /etc/service/rancher_gen/run
COPY default.j2 /nginxconf
COPY start.sh /
# Step 4 – Use baseimage-docker’s init system.
CMD [“/start.sh”]
# Step 5 – Expose ports.
EXPOSE 80
EXPOSE 443
注意Step3中的rancher-gen_run,正是此条指令启用了rancher-gen侦听了Rancher的后端服务,看下脚本内容
#!/bin/bash
rancher-gen –host $RANCHER_GEN_HOST –port $RANCHER_GEN_PORT –access-key $RANCHER_GEN_ACCESS_KEY –secret-key $RANCHER_GEN_SECRET_KEY –project-id $RANCHER_GEN_PROJECT_ID $RANCHER_GEN_OPTIONS –notify “service nginx reload” /nginxconf/default.j2 /etc/nginx/sites-available/default
注意在通知步骤之后,我们是怎样通过名为 /nginxconf/default.j2 和/etc/nginx/sites-available/default 的这两个路径的。前者是Jinjia2模板,后者是渲染模板的输出位置
以下是启用Cache的Nginx配置Jinjia2模板
upstream webserver.backend {
{% for container in containers %}
{% if container[‘state’] == “running” %}
server {{container[‘primaryIpAddress’]}}:9080;
{% endif %}
{% endfor %}
}
server {
listen 80;
server_name webserver_demo;
location / {
proxy_set_header X-Real-IP $remote_addr;
proxy_set_header HOST $http_host;
proxy_set_header X-NginX-Proxy true;
proxy_cache my_cache;
proxy_cache_revalidate on;
proxy_cache_min_uses 3;
proxy_cache_valid any 30m;
proxy_pass http://webserver.backend;
proxy_redirect off;
}
}
关于Rancher-Gen基本介绍就到这里,如果感兴趣,请关注代码实现 https://github.com/pitrho/rancher-gen
最后看看怎么样在Rancher中部署实现3节点的WAS Standalone +Nginx的应用栈吧
首先编写相应的docker-compose.yml和rancher-compose.yml文件
docker.compose.yml
nginx:
ports:
– 9080:80/tcp
environment:
NGINX_RUN_TYPE: rancher-gen
RANCHER_GEN_ACCESS_KEY: 560B5CA0B714BEF574E0
RANCHER_GEN_HOST: 192.168.122.11
RANCHER_GEN_OPTIONS: –stack WAS-Nginx –service was-standalone
RANCHER_GEN_PORT: ‘8080’
RANCHER_GEN_PROJECT_ID: 1a5
RANCHER_GEN_SECRET_KEY: 7QZqs1TgR412FP5oUL9yyNGivbmnbSc9xqaeDNb5
labels:
io.rancher.container.hostname_override: container_name
tty: true
image: harbor01.test01.com/base/nginx-rancher-gen-demo
stdin_open: true
was-standalone:
labels:
io.rancher.scheduler.affinity:container_label_soft_ne: io.rancher.stack_service.name=was-nginx/was-standalone
io.rancher.container.pull_image: always
io.rancher.container.hostname_override: container_name
tty: true
image: harbor01.test01.com/base/ibmwas8:v1
stdin_open: true
rancher-compose.yml
nginx:
scale: 1
was-standalone:
scale: 3
然后切到对应的目录执行rancher-compose up

访问对应的Nginx端口,显示如下,表示已经成功连接到WAS后台

到这里文章结束,希望借此文章抛砖引玉,给大家更多思考!
![]()
相关参考资料
https://developer.ibm.com/wasdev/docs/nginx-websphere-application-server/
https://github.com/WASdev/ci.docker.websphere-traditional
IBM Redbook:sg247957
IBM Redbook:sg248056


